12. Learn how easy it is to -
* adjust your gears;
* alter a brake pad that is rubbing against a rim; and
* true your wheels
* pump up your tyres
Doing your own bike maintenance is simple and satisfying
Being reliant upon your local bike shop for simple problems can cut into your leisure time and enjoyment, and also unnecessarily dent your wallet. Many of us have to "get our heads around new I.T. technology". By comparison, a bicycle is not Rocket Science. Alas, too many cyclists are reluctant to learn simple bike adjustments which are easy peasy, 'cause a bicycle relies on basic mechanics which as kids, many of use understood.
|
For example:
*
During the initial 500km of riding a new bike, the rear gear cable will stretch
marginally whereupon the rear gears won't change as smoothly. It takes 10 seconds to turn the
Adjusting
Barrel
on the rear cassette one tenth (approx) of
a revolution anti-clockwise to tighten the cable which will drag the rear
derailleur arm, and therefore the chain, a tad towards the rear wheel, thereby realigning the rear
derailleur over the correct cog in the rear cassette. or How To Adjust Your Rear Derailleur
Equally, the gear cable to the front derailleur will also stretch.
Alas, there is no Adjusting Barrel on the front derailleur. However, there
should be a Fine Tune Adjustment Knob at the top of the Down Tube for both the
front and rear derailleur. If when straddled over your bike in the cycling
position, you turn the Fine Tune Adjustment Knob (on your left hand side)
anti-clockwise it will move the front derailleur to the outside thereby enabling
you to shift to a larger chain ring easier. It will also move the cable
away from the inner side of your front derailleur if it is touching it when in
your lowest rear cog. |
 |
|
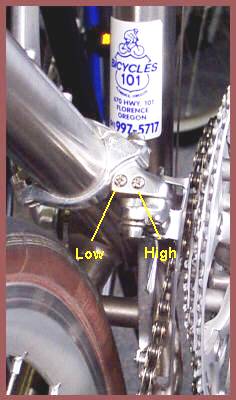
* If your chain comes off on the inside or outside when changing your front
cranks, it only takes a minute to correct the inner and/or outer limit of
movement of the front derailleur with a slight tightening with a small Phillips head screwdriver
of one of the two small adjuster screws, and possibly also tighten the front gear cable ever so marginally. or How To Adjust Your Front Derailleur
|
 |
Equally, ensuring that a brake pad isn't pressing against a rime and truing a bicycle wheel are both easy tasks. Lift the wheel off the ground, spin it and observe if the rim moves closer or further away from the brake pad as it rotates.
If a brake pad is pushing against a rim, twist the brake calliper away from the rim, so that the space between each brake pad and the rim is 3mm or 5mm. Then tighten the bolt which is securing the rear brake to the frame.
The clearance between the brake pad and the rim should be between 3mm and 5mm. If the clearance varies outside this range at a particular section of the rim during each rotation, tighten (with a spoke adjuster) the two or three spoke(s) opposite the wider section, half a rev, a rev or even more (depending on existing tension) to pull the rim across to correct the distortion and bring within the recommended 3mm to 5mm clearance.
(a) Regularly check your –
(i) brakes are adjusting properly and ensure brake pads have >2mm of protruding rubber,
(ii) brake and gear cables by flipping your bike upside down and ensuring the cables under your front cranks are not frayed,
(iii) wheels (taunt, trued, with firm quick-releases), and
(iv) tyres which should be in good condition and inflated to the air pressure as written on the tire sidewall – usually around 110 psi for 23mm road tyres and lower pressure for wider tyres. Decrease the pressure up to 20psi on a wet day for better traction. Check the tire tread and sidewalls for cuts and bruises.
(b) Make sure your handlebars and seat are not loose.
(c) A badly adjusted derailleur can cause the rear wheel to suddenly lock.
(d) Investigate any rattles or noises.
(e) Clean your chain drive as cleanliness reduces the destructive wear which grime causes. A clean chain drive will also protect your clothing from stains and makes your bicycle easier to pedal. Select a quality lubricant designed to reduce grime attraction. Wipe the chain down after lubrication so the outside of the chain will not accumulate grime.
(f) After cycling in the rain, allow your bicycle to dry completely and revitalise your chain and rear cassette with a few drops of chain lubricant as you spin the rear wheel.
Pumping up you tyres:
U Tube on the three types of tyre valves
U Tube on pumping up a Presta (French style) valve on a road bike tyre
Routine maintenance is simple and satisfying - learn to do it yourself. The majority of experienced cyclists know lots about bike maintenance. The internet provides plenty of useful links: